
Originally posted on 17th Mar 2025
To get rid of fly eggs, physically remove every visible cluster with a paper towel or flat scraper, then treat the surface with boiling water or a scrub of white vinegar mixed at equal parts with water. For stronger disinfection, apply a diluted bleach solution at a 1:10 ratio with water. Seal all contaminated material in a plastic bag and dispose of it in an outdoor bin immediately — not your indoor trash can. For eggs embedded in drain biofilm, flush with boiling water followed by an enzymatic drain cleaner. Speed matters here: under typical indoor conditions, house fly eggs hatch into larvae in as few as 8 hours. A batch you notice at breakfast can be writhing maggots by dinner.
That's the protocol. But before you grab the vinegar, confirm what you're actually looking at.
Key Takeaways
- Fly eggs are tiny and easy to miss. At roughly 1.2 mm long, eggs are deposited in clusters of 75 to 150 in crevices, drain biofilm, and under container rims — inspect with a flashlight held at an angle.
- Remove, treat, disinfect — in that order. Physically remove egg clusters, apply boiling water or a vinegar solution, then disinfect with diluted bleach (1:10 ratio) for a complete elimination protocol.
- You have 8 to 20 hours before eggs hatch. House fly eggs hatch rapidly under warm conditions (77–86°F), so same-day action is critical.
- Drains are the most persistent reinfestation source. Enzymatic drain cleaners break down the organic biofilm that larvae feed on, where chemical drain openers do not.
- A single female can lay up to 500 eggs in her lifetime, completing the egg-to-adult cycle in as few as 7 to 10 days — making prevention essential.
- Prevention comes down to three conditions: deny flies the moisture, organic matter, and warmth their eggs require to survive.
- Sealed waste containment is the highest-impact upgrade. A sealed, gasketed trash can or compost bin removes the single largest fly attractant in most areas.
How to Identify Fly Eggs
A crumb, a grain of spilled rice, a fleck of lint — fly eggs look like all of these at first glance. Proper fly egg identification before you start treatment ensures you're solving the right problem.
What Do Fly Eggs Look Like?
House fly eggs are roughly 1.2 millimeters long, about the size of a single grain of short-grain rice. They're elongated and slightly curved, white to pale yellow, and almost always clustered rather than scattered. A single batch typically contains 75 to 150 eggs laid in overlapping rows, giving the cluster a slightly raised, textured appearance against whatever surface it's on.
That clustering pattern is your most reliable identifier. Moth eggs tend to be rounder and are often deposited in more organized patterns. Beetle eggs are darker and deposited individually near food sources. Ant pupae — sometimes mistaken for maggot eggs — are significantly larger, oval, and found inside nest structures rather than on exposed surfaces. Small, white, rice-shaped specks clustered in a damp area near organic waste? That's almost certainly what you think it is.
Where Flies Lay Eggs: Common Breeding Sites
Flies don't lay eggs at random. They seek out the three things their larvae need to survive: moisture, organic matter, and warmth.
- Waste zones top the list: The interior rim of a kitchen trash can, the underside of garbage disposal splash guards, compost bins without sealed lids, recycling containers with food residue.
- Drain systems are the second major category: Kitchen sink drains, bathroom drains, and floor drains all accumulate organic biofilm over time, providing both food and moisture for developing larvae.
- Organic matter deposits round it out: overripe fruit left in bowls, liquids spilled beneath appliances and forgotten, pet food left out after feeding, soiled cleaning rags balled up under the sink.
Here's the part most people miss: fly eggs are often invisible to casual inspection. Females deposit them deliberately in crevices, under container rims, and inside biofilm layers where they're shielded from disturbance. If you suspect an infestation, inspect likely areas with a flashlight held at an angle — the light catches the slight sheen of egg clusters that are otherwise impossible to spot. Maggots that seem to appear from nowhere are really just eggs that hatched in locations you never thought to check. For a deeper look at that phenomenon, see How Do Maggots Form Without Flies?
Now that you know where to look, here's how to eliminate what you find.
Step-by-Step: How to Remove and Destroy Fly Eggs
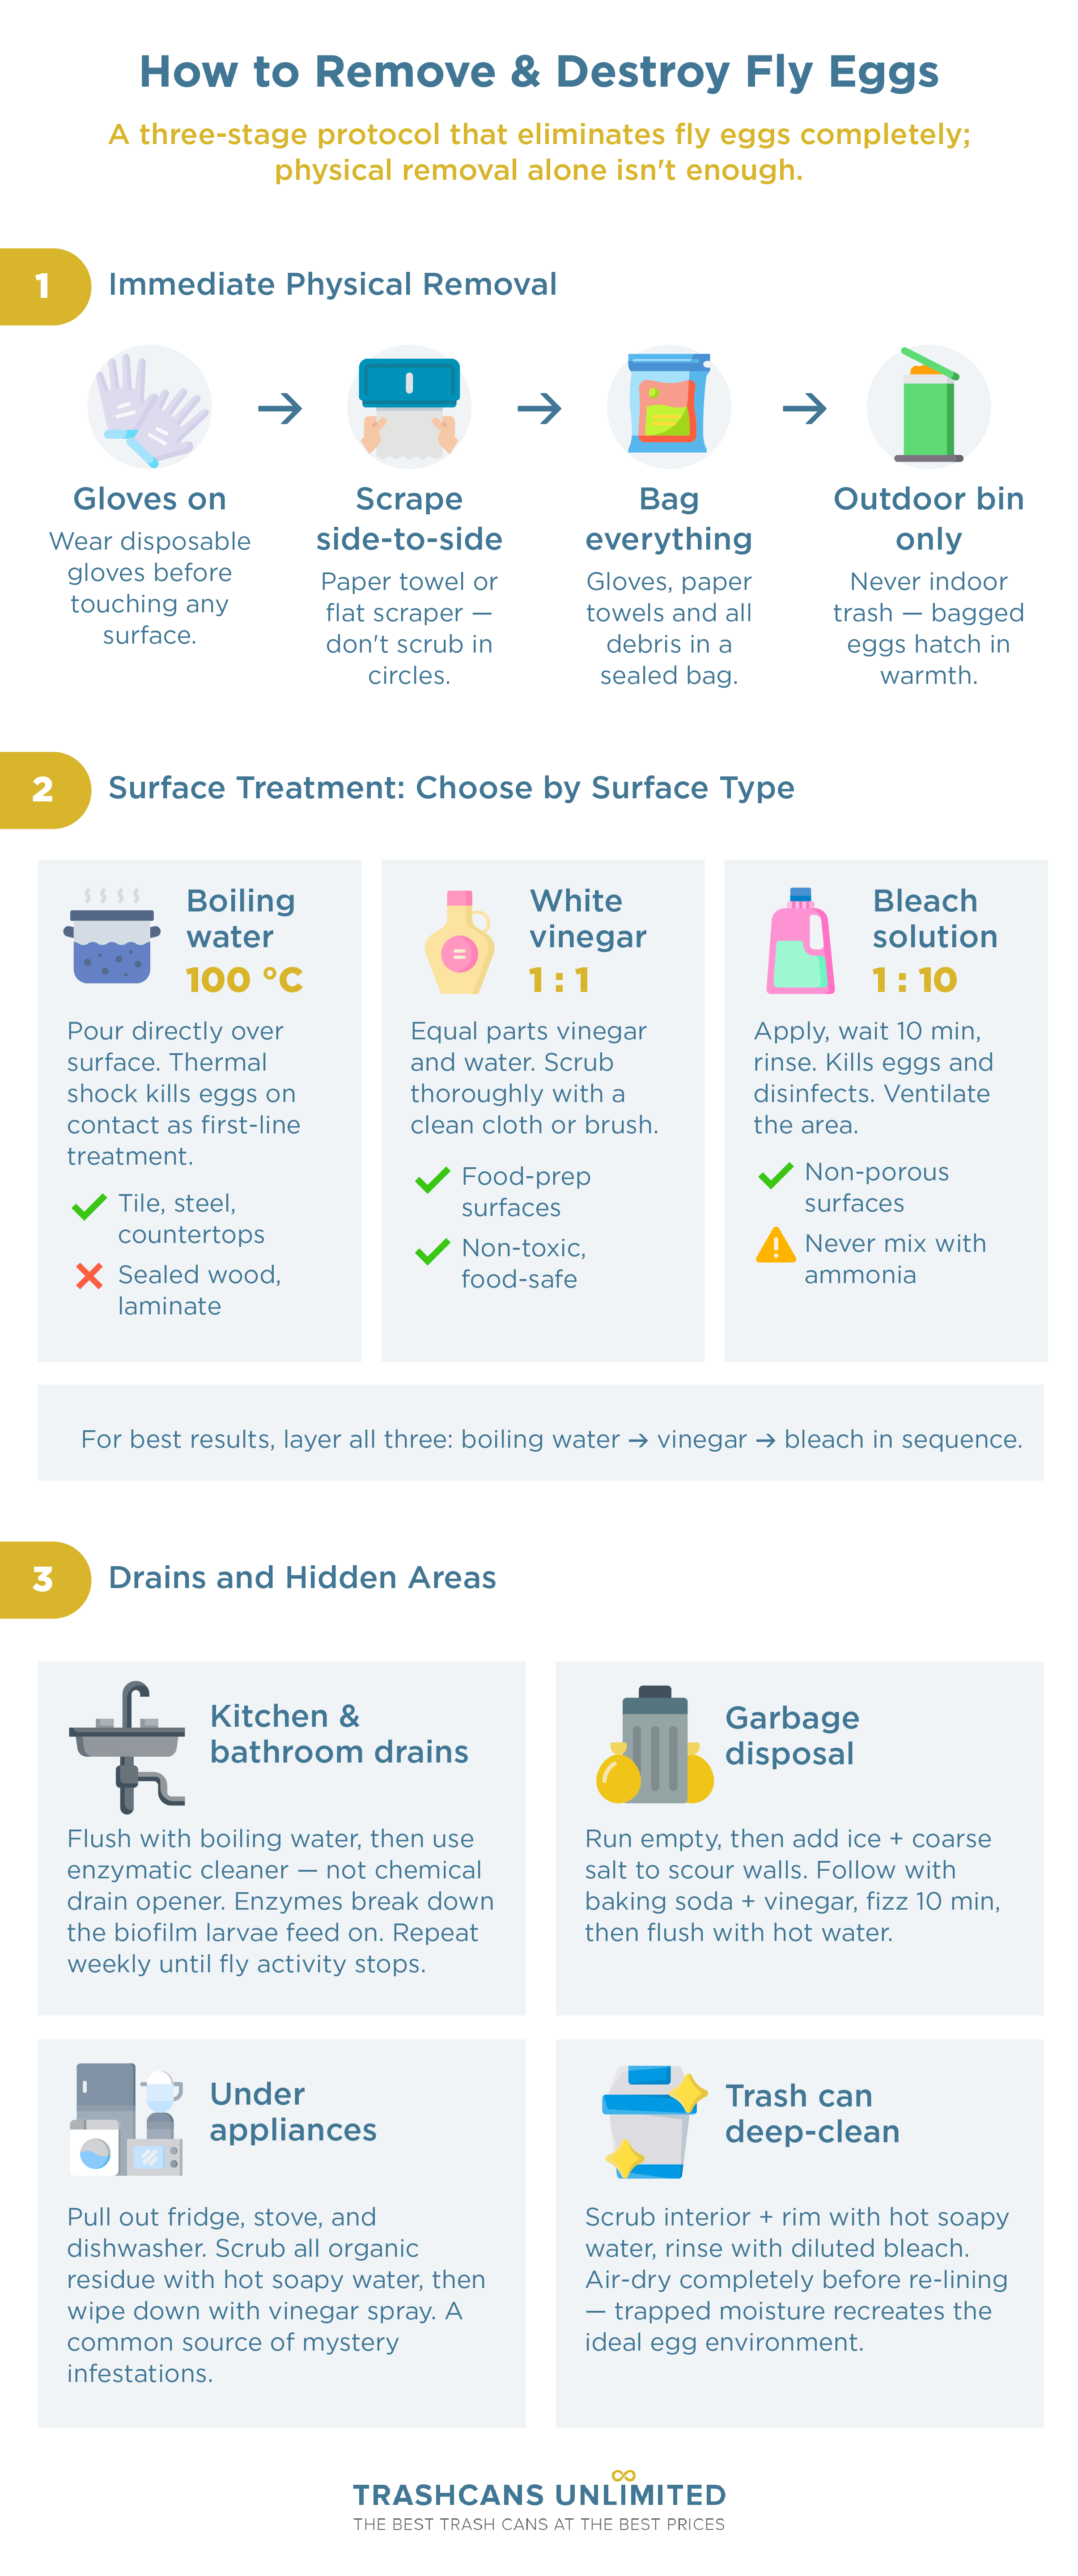
Physical removal alone won't solve this. Eggs lodged in crevices, biofilm, and microscopic surface imperfections survive wiping. The complete protocol is a three-stage sequence — remove, treat, disinfect — and skipping any stage leaves viable eggs behind.
1. Immediate Physical Removal
1.1. Put on disposable gloves. Fly eggs are deposited on surfaces already contaminated with the organic material that attracted the fly — this is a hygiene issue as much as a pest issue.
1.2. Use a paper towel, flat scraper, or stiff-bristled brush to collect all visible egg masses. Work methodically from one side of the affected area to the other. Don't scrub in circles — you'll scatter eggs into crevices rather than lifting them off.
1.3. Place all contaminated material — paper towels, gloves, scraped debris — into a sealable plastic bag.
1.4. Seal the bag and place it directly in an outdoor garbage bin. Not your indoor trash can. Eggs inside a sealed bag in a warm indoor bin will hatch within hours, and you'll have traded one problem for another.
Physical removal handles the bulk of visible eggs. But residual eggs embedded in surface imperfections and crevices will survive, which is why the treatment steps that follow are not optional.
2. Surface Treatments That Kill Fly Eggs on Contact
Not every surface tolerates the same treatment. Listed from gentlest to strongest — use the method that matches your surface, or layer multiple treatments for thorough coverage.
2.1. Boiling water flush (100°C). Pour directly over hard, non-porous surfaces and drain openings. Thermal shock kills eggs on contact. First-line treatment for countertops, tile, stainless steel, and drains. Avoid on sealed wood, laminate, or painted finishes — the heat damages protective coatings.
2.2. White vinegar and water solution (1:10 ratio). Mix equal parts white vinegar and water. Scrub the affected area thoroughly with a clean cloth or brush. Effective as a surface cleaner and mild disinfectant for sanitizing food-preparation surfaces after physical egg removal, with one key advantage: it's non-toxic and safe around food. The preferred choice for kitchen counters, cutting board areas, and stovetops.
2.3. Diluted bleach (1:10 ratio). One part bleach, ten parts water. Apply to non-porous surfaces, let sit for a full 10 minutes, then rinse thoroughly. Kills eggs and provides residual disinfection. Safety is non-negotiable here: work in a ventilated area (open a window or run an exhaust fan), wear gloves, protect your eyes, and never — under any circumstances — mix bleach with ammonia-based products. The combination produces chloramine gas, which is acutely toxic.
These aren't competing options — they're complementary. The most effective protocol layers them in sequence: physical removal first, boiling water or vinegar to kill residual eggs, then diluted bleach for disinfection.
3. Get Rid of Fly Eggs in Drains and Hidden Areas
Drains are the most persistent source of reinfestation. The organic biofilm lining their interior walls provides an ideal egg-laying substrate that survives normal water flow, which means surface-level cleaning won't reach the problem.
3.1. Drain treatment protocol. Start with a boiling water flush — a full kettle poured slowly down the drain. Follow with an enzymatic drain cleaner, not a chemical drain opener. The distinction matters: chemical openers dissolve hair and grease clogs, but they don't break down the biological film that fly larvae actually feed on. Enzymatic cleaners contain enzymes — and often beneficial bacteria — that break down organic biofilm over time. Repeat weekly until fly activity around the drain stops.
3.2. Garbage disposal cleaning. Run the disposal empty for 10 seconds to clear loose debris, then drop in a handful of ice cubes and two tablespoons of coarse salt. Run again — the ice and salt scour the interior walls mechanically. Follow with half a cup of baking soda, then one cup of white vinegar. Let the mixture fizz for 10 minutes before flushing with hot water.
3.3. Under-appliance inspection. Pull out your refrigerator, stove, and dishwasher. The gaps behind these appliances are where spilled liquids, fallen food scraps, and condensation pool — precisely the trifecta flies seek. Clean all organic residue with hot soapy water, then wipe down with a vinegar spray. This is often where "mystery" infestations originate: eggs laid in organic matter you didn't know was there.
3.4. Trash can deep-clean. Empty the can completely, then scrub the entire interior with hot water and dish soap — pay special attention to the bottom rim and any grooves or seams where residue hides. Rinse with diluted bleach. The critical final step: let the can air-dry completely before putting a new liner in. Moisture trapped inside a re-lined can creates exactly the environment fly eggs need. For guidance on liners that minimize residue buildup, see What Bags to Use for Food Waste.
With the immediate threat eliminated, the next question is what attracted egg-laying flies in the first place — and how to make sure they don't come back.
The Biology Behind Fly Infestations
Knowing how to kill fly eggs is reactive. Knowing why they appeared is what makes you proactive. The biology behind fly reproduction is straightforward, and once you see it clearly, every prevention measure in the next section will feel like common sense rather than a chore.
The Fly Lifecycle: From Egg to Adult in Under Two Weeks
House flies (Musca domestica) develop through four stages: egg, larva (maggot), pupa, and adult. Under optimal conditions, the entire cycle — from freshly laid egg to a new adult capable of reproduction — completes in as few as 7 to 10 days.
That timeline unfolds like this:
- Hour 0: Eggs laid in a moist, organic-rich location.
- Hours 8–20: Eggs hatch into first-stage larvae. Under warm, humid conditions (77–86°F), hatching begins in as few as 8 hours.
- Days 3–5: Larvae feed aggressively on surrounding organic material, growing through three larval stages (instars).
- Days 7–10: Mature larvae migrate to a drier spot to pupate, forming a dark, capsule-like pupal case.
- Days 10–14: Adult flies emerge and can mate within 24 hours, beginning the next generation's egg-laying cycle within days.
A single female house fly can lay up to 500 eggs in her lifetime, deposited in batches of 75 to 150. If you spot fly eggs Monday morning and wait until Monday evening, you're likely already dealing with larvae. By the following weekend, those larvae could be new adults laying eggs of their own. The math compounds relentlessly, which is why the first 8 to 24 hours after discovery matter so much.
The Three Conditions Flies Need to Breed
Every fly infestation traces back to the same three environmental factors. Remove any one and you dramatically reduce egg viability.
- Moisture. Fly eggs desiccate and die without adequate humidity. Damp surfaces, condensation, standing water, wet organic material — all provide the moisture eggs need to develop. Dry environments are hostile to fly reproduction, which is why air-drying your trash can after cleaning matters more than it seems.
- Organic matter. Decomposing food, animal waste, compost, drain biofilm — these serve as both food source for larvae and incubation medium for eggs. Flies aren't attracted to clean surfaces. They're attracted to the organic residue on surfaces. The distinction matters: cleaning isn't about appearance. It's about removing the biological substrate that sustains the entire lifecycle.
- Warmth. Temperatures between 77 and 86°F (25–30°C) push egg development to its fastest rate. Enclosed indoor spaces — kitchens, utility rooms, poorly ventilated bathrooms — provide these conditions passively, especially during warmer months. This is why infestations spike seasonally: heat doesn't create the problem, but it compresses the egg-to-adult timeline so dramatically that populations seem to appear overnight.
Together, these three conditions reframe prevention from a vague "keep things clean" into something precise: deny flies the specific combination of moisture, food, and warmth their eggs need to survive.
Health Risks of Fly Eggs and Larvae
House flies are mechanical vectors. They don't produce toxins, but they physically carry pathogens on their bodies, legs, and mouthparts, depositing them on every surface they touch. A systematic review identified at least 130 pathogens isolated from house flies, with enteric bacteria among the most frequently detected — including Salmonella, E. coli, and Shigella species, all of which can cause gastrointestinal illness.
Fly eggs on food or food-contact surfaces are a direct contamination signal. The eggs aren't toxic, but their presence means a fly landed, fed, and deposited eggs — transferring whatever bacteria it carried in the process. Discard any food with visible egg deposits. Don't attempt to wash and salvage it.
Maggot infestations in food storage or preparation areas represent a more advanced contamination event and should trigger a full cleaning protocol for the affected zone. And beyond the health considerations, there's this: persistent fly and maggot sightings erode something that's hard to get back — the basic confidence that your place is clean.
The biology and the health risks point the same direction: prevention beats repeated reaction.
How to Prevent Fly Eggs from Coming Back
Elimination handles the crisis. Prevention ends the cycle. The strategies below are organized as an escalating protocol — daily habits that cost nothing, weekly maintenance for deeper protection, and one-time infrastructure upgrades that remove the conditions flies depend on permanently.
Daily Sanitation Habits That Break the Breeding Cycle
These are low-effort routines with outsized impact. Each one denies flies the organic matter and moisture their eggs require:
- Dispose of food scraps immediately after meal prep. Not in an open bowl on the counter. Not "after this episode." During warm months, the window between table scrap and fly breeding site is measured in hours.
- Rinse all recyclables before placing them in bins. That thin film of tomato sauce on a can or beer residue in a bottle is enough.
- Wipe counters and stovetops nightly with a vinegar-water solution. This removes organic residue that's invisible to you but obvious to a fly's chemoreceptors.
- Empty indoor trash cans daily during warm months. Never let organic waste sit overnight. A sealed bag in a closed bin helps — but getting the waste out entirely is what actually works.
- Store pet food in sealed containers and remove uneaten portions within 30 minutes. Wet pet food left in bowls is one of the most overlooked fly attractants in homes.
The bags you use for food waste also matter more than most people realize. For a closer look at materials and features, see What Are Food Waste Bags Made Of?
Weekly Maintenance That Keeps Flies Out
These moderate-effort tasks target the organic buildup that accumulates where daily cleaning doesn't reach:
- Deep-clean kitchen and bathroom drains with boiling water followed by an enzymatic cleaner. Biofilm accumulates continuously — weekly treatment keeps it below the threshold that attracts egg-laying.
- Scrub the interior of all trash cans with hot soapy water. Rinse, then air-dry completely before re-lining. That liquid pooling at the bottom of a lined can? It's a concentrated organic slurry — exactly what flies seek out.
- Inspect under appliances, behind furniture, and inside utility closets for spills or organic accumulation. These forgotten zones are where infestations incubate undetected.
- Launder cleaning rags, sponges, and mop heads. Damp cloths loaded with food residue are incubation chambers. Hot water wash, or replace weekly.
- Check and clean compost bins or kitchen compost collectors. Even well-managed compost generates the compounds that draw flies. Fly eggs in compost bins are especially common during warm months — regular cleaning of the container itself prevents eggs from gaining a foothold on interior surfaces.
Infrastructure Upgrades for Long-Term Fly Prevention
Daily habits and weekly maintenance reduce risk. Infrastructure upgrades eliminate it. These are one-time investments that remove the environmental conditions flies need — not manage them, remove them.
- Sealed waste containment. Often the single most effective change you can make. Trash cans and compost bins with tight-fitting, pest-resistant lids deny flies physical access to organic waste entirely. An open or loosely covered compost bin is, from a fly's perspective, an open invitation. A sealed bin with a gasketed lid removes the largest attractant in most kitchens. Purpose-built compost bins with sealed lids eliminate the conditions egg-laying flies depend on.
- Drain maintenance systems. Install drain screens or hair catchers to reduce the organic material entering drains and feeding biofilm accumulation. Less biofilm, fewer breeding sites.
- Window and door screens. Ensure all entry points are fitted with tight-fitting, intact mesh screens — a proven exclusion method for house flies. Standard 18×16 mesh is the industry norm and effectively blocks house flies. Inspect seasonally for tears or gaps — a single hole is enough to admit egg-laying females.
- Outdoor waste enclosure management. Position exterior bins as far from doors and windows as practical. Clean outdoor enclosures monthly with a hose and diluted bleach to prevent the organic buildup that draws flies toward your property.
When to Call a Professional
Most fly egg infestations resolve completely with the protocols above. But some situations require professional help:
- Persistent reinfestation after completing the full sanitation protocol suggests a hidden breeding source — possibly inside wall voids, under flooring, or in areas not accessible without tools.
- Maggots in structural areas like ceiling cavities, subfloor spaces, or behind walls indicate an organic source (often a deceased animal or hidden leak) that requires professional remediation.
- Disproportionate fly populations relative to the organic waste in your place may point to a breeding source on a neighboring property or in shared building infrastructure.
Frequently Asked Questions About Fly Eggs
How fast do fly eggs hatch? Under warm, humid conditions (77–86°F), house fly eggs typically hatch in 8 to 20 hours. Cooler temperatures slow development but rarely prevent it — eggs can remain viable for several days as long as moisture is present.
Can fly eggs make you sick? Fly eggs themselves aren't toxic. But house flies are mechanical vectors for bacteria including Salmonella and E. coli, and eggs on food or food-contact surfaces signal that contamination has likely occurred. Discard any food with visible egg deposits.
What kills fly eggs instantly? Boiling water and diluted bleach (1:10 ratio) both kill fly eggs on contact. White vinegar solutions are also effective for cleaning and sanitizing food-preparation surfaces after physical egg removal. For best results, combine physical removal with a surface treatment.
Where do flies lay eggs? Trash cans, kitchen and bathroom drains, compost bins, garbage disposals, overripe fruit, pet food bowls, and organic spills beneath appliances. Flies target any location combining moisture, organic matter, and warmth.
Act Fast, Then Seal the Source
Fly eggs are a problem measured in hours, not days. The 8-to-20-hour hatching window means the distance between a few white specks on a trash can rim and a full maggot infestation is disturbingly short. But the elimination protocol is just as fast: physical removal, surface treatment with boiling water or vinegar, disinfection with diluted bleach, and immediate outdoor disposal.
That handles the crisis. Lasting prevention comes down to breaking the three conditions fly eggs require — moisture, organic matter, and warmth. Daily habits deny flies the substrate they need. Weekly maintenance catches the buildup that accumulates in drains, under appliances, and inside bins. And infrastructure upgrades — sealed waste containers, drain screens, intact window mesh — replace willpower with engineering.
In most cases, the highest-impact single change is sealing your organic waste. An open compost bin is a permanent invitation. A sealed, purpose-built container is a closed door. Explore sealed compost bins and waste containment solutions to remove the breeding conditions flies depend on.