
You lift the lid on a warm afternoon and the smell arrives before the bag does. You have cleaned this garbage can before. You hosed it out, maybe emptied a box of baking soda into it, and for about four days it worked.
Here is why it came back. Most advice on how to get rid of garbage can smell treats odor as a fragrance problem and reaches for something that smells stronger. Odor in an outdoor bin is a moisture problem. Bacteria living in the residue at the bottom of your garbage can produce it continuously, and no amount of scent laid on top of them changes that.
What follows is a two-phase fix. One thorough cleaning removes the source. One short routine keeps it from rebuilding. The first takes half an hour of work plus a few hours of drying. The second takes two minutes a week.
The Seven Steps That Fix It, and Keep It Fixed
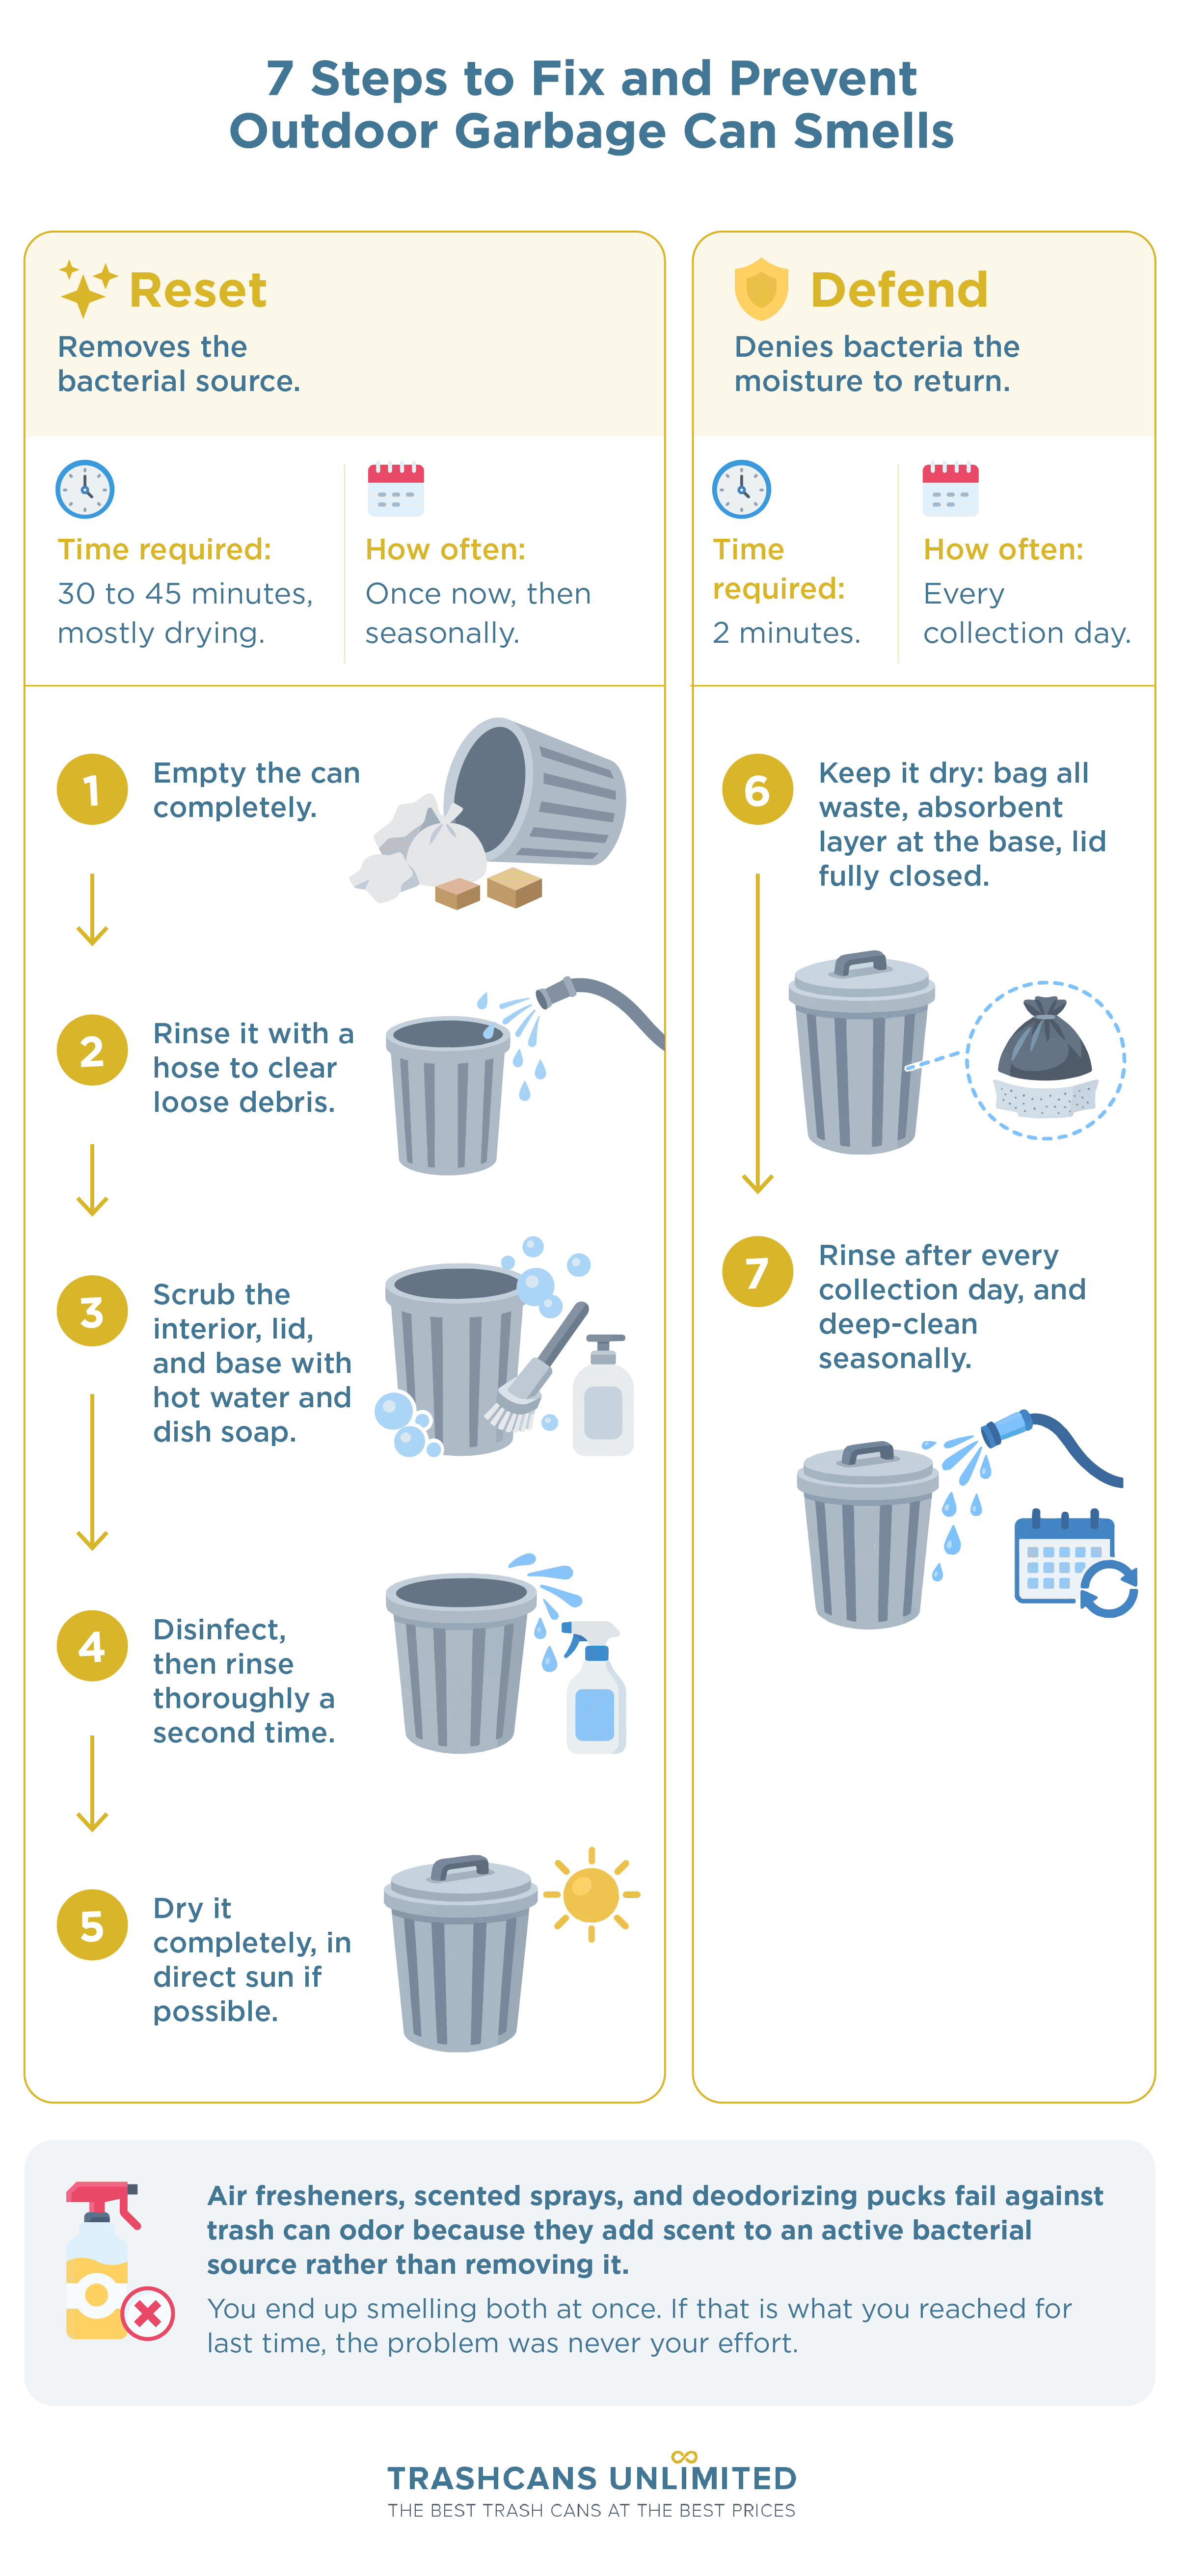
Here is how to get rid of garbage can smell, start to finish. Do the first five once. Do the last two on repeat.
- Empty the can completely.
- Rinse it with a hose to clear loose debris.
- Scrub the interior, lid, and base with hot water and dish soap.
- Disinfect, then rinse thoroughly a second time.
- Dry it completely, in direct sun if possible.
- Keep it dry: bag all waste, absorbent layer at the base, lid fully closed.
- Rinse after every collection day, and deep-clean seasonally.
Steps one through five are the Reset. They remove the bacteria producing the smell. Steps six and seven are the Defend. They deny those bacteria the moisture they need to rebuild.
Air fresheners, scented sprays, and deodorizing pucks fail against trash can odor because they add scent to an active bacterial source rather than removing it. You end up smelling both at once. If that is what you reached for last time, the problem was never your effort.
The defense phase is easier to stick with once you understand what you are defending against.
Why Outdoor Garbage Cans Smell So Bad (And Why It Gets Worse Over Time)
The three conditions bacteria need
Odor-causing bacteria, mold, and mildew need three things to thrive inside a bin: food waste, moisture, and warmth. Your garbage can supplies all three by design. Reducing the food that goes in helps, and the EPA's guidance on preventing wasted food is a reasonable place to start.
Of the three, moisture is the only one you control completely. Food waste is a given, and outdoor temperature and humidity are not negotiable. Every practical tactic in this article eventually points at keeping the can dry.
What actually produces the smell
As bacteria break down proteins and other organic matter, they release sulfur- and ammonia-based gases. That is why outdoor garbage can smell reads as sour and sharp rather than simply dirty.
It is also why perfume fails so completely. Fragrance sits alongside those gases instead of removing them.
Why summer makes everything worse
Outdoor garbage can smell is a summer complaint far more than a winter one. Bacterial activity accelerates as temperatures climb. A can that stays tolerable for two weeks in March will turn in three days in August.
That single fact drives two recommendations: tighten your deep-clean interval in summer, and keep the bin out of direct afternoon heat.
The liquid at the bottom is the real problem
Leaks, spills, and dripping bags leave residue pooled at the base of the bin. That residue is what survives a casual rinse, and it re-seeds every new bag you drop on top of it.
Material that sits wet on plastic for weeks stops behaving like a spill and starts behaving like a film. It bonds to the surface, and water runs straight over it. This is why the smell returns within days of cleaning, and why the fix requires physical scrubbing rather than a stronger cleaner.
Flies, maggots, and critters
Pests are a symptom of active decomposition and an accelerant of it. Garbage can maggots are the clearest signal that an organic source is still sitting in the bin.
The timing explains a lot. Under optimal summer conditions, flies develop from egg to adult in as little as seven days, so a garbage can you cleaned last week can be producing adult flies this week. The eggs were laid on exposed food waste, not carried in. The fix is the deep clean, not a pesticide: university extension guidance on fly management holds that pesticides are no substitute for sanitation and the removal of fly developmental sites.
|
What you're noticing |
What's causing it |
Where the fix is |
|
Sour smell days after rinsing |
Residue film at the base |
Deep-clean section |
|
Smell only in hot weather |
Accelerated bacterial activity |
Prevention and schedule |
|
Visible maggots |
Exposed food waste in the bin |
Deep-clean section |
|
Smell even when the can is empty |
Residue and scratched interior |
Deep-clean and inspection |
|
Standing water after rain |
Lid not sealing |
Prevention section |
No prevention tactic works while the original source is still sitting in the can. Every answer to how to get rid of garbage can smell starts with the reset.
How to Deep-Clean a Garbage Can That Already Smells
Every prevention tactic in this guide assumes you are starting from a neutral can. Here is how to clean a garbage can back to neutral. Set aside 30 to 45 minutes, though most of that is drying time you can walk away from. Do it on collection day while the bin is empty. If you want the complete method in detail, our full walkthrough on how to clean outdoor garbage cans goes further than this section does; what follows is focused specifically on odor.
What you need:
- Hose, or a pressure washer on a moderate setting
- Stiff-bristle scrub brush with a long handle
- Dish soap
- Chlorine bleach
- Gloves and eye protection
- Empty and rinse. Tip out everything, then rinse with a hose to dislodge loose debris. If you use a pressure washer, keep it on a moderate setting and hold the nozzle back from the surface. High pressure scratches plastic. A scratched interior gives residue somewhere to sit below the surface, out of reach of both the brush and the rinse. That damage is permanent and it accumulates.
- Mix the cleaning solution. A few drops of dish soap in a gallon of hot water is enough. More soap means more rinsing, not more cleaning.
- Scrub every surface. Work the interior walls, the base, the lid, and the underside of the lid. Get the places people skip: the lid rim, the hinge, the wheel wells, and the seams where the base meets the walls. Skipping or rushing this step is the most common reason bleach appears to fail. CDC is explicit about the order: clean visibly dirty surfaces with soap or detergent before disinfecting with household bleach.
For safety, never mix bleach with vinegar, ammonia, or any other cleaner. Bleach and acids such as vinegar give off chlorine gas; bleach and ammonia give off chloramines. Rinse the can thoroughly before bleach touches it, work outdoors, and wear gloves and eye protection. If you have already sprayed vinegar in the can, rinse it out completely first. See state health department guidance on mixing bleach for the full list.
- Disinfect. Mix five tablespoons, or one-third cup, of household bleach per gallon of room-temperature water. Keep the surface visibly wet for at least one minute, the contact time CDC specifies where a label gives none. On a vertical bin wall the solution runs off in seconds, so reapply rather than spraying once and walking away. Check your bottle first: CDC calls for unscented household bleach at 5 to 9 percent sodium hypochlorite, and rules out some laundry and splashless formulations.
- Rinse thoroughly, again. Flush every surface until no bleach smell remains. Residue left behind reacts with the next load of waste and creates a new odor of its own.
- Dry completely. Prop the lid open, tip the base so water drains instead of pooling, and give it a few hours in the sun if you have them. This step is the one most often skipped and the one that undoes everything else. Every prior step removed the bacterial source; drying denies the survivors the only condition they need. A can put away damp has been cleaned and re-seeded the same afternoon.
Before you start, check your local rules. Some municipalities restrict washing waste containers into storm drains, so drain onto lawn or gravel where that is permitted.
Scaling up: multiple cans
Batch the work. Clean outdoor garbage cans in sequence on collection day while they are all empty, stage them together to dry, and write the process down as an assignable task rather than leaving it to whoever notices. Mix bleach solution in small batches you will use within the session. CDC advises a fresh dilution daily, since a solution is less effective more than 24 hours after mixing.
For containers that see heavier use, see how to clean and care for commercial trash cans.
The can is neutral now. What goes in next determines how long it stays that way.
What Natural Odor Neutralizers Can and Cannot Do
Before you reach for any of these, it helps to know which of three jobs each one is doing. Some absorb moisture and odor. Some mask it with a competing scent. One genuinely cleans. None of them disinfect, which is what the bleach step was for and why that step is necessary.
That framing matters, because common advice on how to deodorize a garbage can presents these as interchangeable. They are not, and the difference determines whether you are solving a problem or covering one.
|
Neutralizer |
Category |
How it works |
How to apply |
Refresh |
Watch out for |
|
Baking soda |
Absorb |
Neutralizes both acidic and basic odor compounds on contact |
Half a cup across the base, light scatter over each bag |
At each deep clean, or when it clumps |
Saturates and stops working, clumping means it is spent |
|
White vinegar |
Clean |
Acetic acid lifts organic residue and cuts odor |
1:1 with water as a spray on a rinsed can, wipe after a few minutes |
Weekly as needed |
Never near bleach, cleans but does not sanitize |
|
Coffee grounds |
Absorb / mask |
Porous grounds take up odor and add a competing scent |
Dried, in a breathable container |
Monthly |
Wet grounds add moisture, may attract wildlife |
|
Citrus peels |
Mask |
Peel oils leave a fresh scent |
Tucked near the lid |
Weekly |
Food matter, may attract wildlife |
|
Essential oils |
Mask |
Provides scent coverage between cleanings |
A few drops on a cloth under the lid |
Weekly |
Some oils are harmful to cats and dogs |
Two of these deserve a closer look. White vinegar is the only product in this group that genuinely cleans, but cleaning is not the same as disinfecting. It lifts residue and cuts odor well, but it is not among the products EPA registers as disinfectants, and it will not sanitize a bin. Baking soda (sodium bicarbonate) is the most useful of the rest, and its real limitation is not its chemistry but its capacity. It works on contact and it saturates, so a layer you laid down in June is doing nothing by August.
Coffee grounds and citrus peels are food matter, which means they can draw wildlife depending on where you live. Essential oils carry a genuine pet caveat, particularly for cats, so keep them out of reach.
Everything here manages odor that has already started. The tactics that prevent trash can smell before it starts are cheaper, faster, and considerably less unpleasant.
Stop Outdoor Garbage Can Smell Before It Starts
These are ranked by impact, highest first. If you only do the first two, you have solved most of the problem. Together they are how you prevent trash can smell without adding work to your week.
- Use quality bags and the right liner fit. A leak-proof bag that actually fits the can is the single highest-impact thing on this list. Check the fit rather than the label: if the cuff will not fold over the rim and stay put, the bag is undersized, and every load pushes it down the wall. Liquid then runs between the bag and the plastic, straight down to the base residue that causes the problem in the first place. An oversized bag pooling at the bottom is the same failure from the other direction.
- Double-bag and seal food waste. Tie bags closed before they go in, and double-bag anything wet. Sealed waste is waste flies cannot lay eggs on, so household garbage must be bagged and sealed before it goes into an outdoor container. It matters far more in July than in January.
- Keep baking soda working continuously. Half a cup at the base and a scatter over each bag, replaced when it clumps.
- Absorb moisture at the base. Lay a one to two inch layer of unscented clay-based cat litter across the bottom, roughly two to three cups for a standard curbside bin. Clay litter is a cheap desiccant. Replace it on collection day whenever it looks damp, and monthly at minimum through summer. Saturated litter is worse than none at all, because it becomes a wet layer sitting against the base.
- Add dryer sheets under the lid. Tucked under the lid, they add a fresh scent between cleanings. That is the entire benefit. The mask does nothing for the source.
- Keep the lid closed and sealing properly. Most people think of the lid as keeping smell in. Sanitation guidance treats a tight-fitting lid as a containment requirement for bagged garbage. In practice, its more important job is keeping rain out. One storm with a lid that no longer seats puts standing water at the base of a can you just spent forty minutes cleaning.
A lid that has warped, a hinge that has broken, or a rim that no longer seats leaves a can permanently vulnerable no matter how well you maintain it. If yours no longer closes flush, no routine will fix that, and replacing it costs less than another summer of this. Our outdoor garbage cans are built around lids that seal.
- Move the bin out of the heat. Position it away from prolonged afternoon sun, which slows bacterial activity between pickups. Shade for storage, sun for drying: the two are not in conflict, since drying only applies to a can that is already empty and clean.
Scaling up: multiple cans
Standardize liner sizes across the property so staff cannot mis-fit a bag, and put lid condition on the routine inspection list rather than waiting for a complaint to surface it.
None of this works as a one-time effort. It works as a habit, and habits need a schedule.
The Two-Minute Routine That Keeps a Can Clean
The most useful thing here is not a cleaning technique. It is a piece of timing. Collection day is the only moment your can is reliably empty, which turns a thirty-minute job into a two-minute one. Rinse it out and deodorize it with baking soda or a vinegar spray while the truck is still down the street, and you never have to schedule the job at all.
Build the rest around your own collection day and your own climate. Put the can out weekly even when it is not full, since garbage standing longer than a week is likely to produce adult flies. Here is a garbage can cleaning schedule that works for most households:
|
Frequency |
Task |
Time |
Why it matters |
|
Every collection day |
Rinse the empty can, refresh absorbent layer |
2 minutes |
Removes residue before it becomes a film |
|
Monthly |
Replace base absorbent, wipe the lid and rim |
5 minutes |
Stops moisture accumulating unnoticed |
|
Seasonally |
Full deep clean, all six steps |
30 to 45 minutes |
Removes anything the weekly rinse missed |
|
Annually |
Inspect the can itself for damage |
5 minutes |
Catches failures no cleaning can fix |
Deep-clean every four to six weeks through summer and every ten to twelve weeks in cool months. Treat those as starting points rather than rules. If the can smells before the next scheduled clean, the interval is too long, so tighten it by two weeks and hold there. In consistently hot or humid regions, treat the summer figure as year-round.
Once a year, check the can itself:
- Lid seats flush against the rim
- Hinges intact and moving freely
- No hairline cracks at the base
- Wheels and wheel wells clear
- No deep interior scratches
- Base drains rather than holding water after rain
If that inspection turns up cracks, a lid that no longer seals, or an interior scratched past the point where scrubbing reaches the residue, no schedule will keep that trash can odor-free. At that point a replacement outdoor bin is the fix, not more cleaning.
Scaling up: multiple cans
Turn the table above into a documented, assignable task with a name attached to each frequency. A schedule that lives in one person's head does not survive their notice period. For larger containers, getting rid of dumpster smell covers the differences.
A few situations sit outside this system, and they are worth answering directly.
Questions That Come Up Often
How do I get rid of maggots in my garbage can?
Get the food waste out and run the full deep clean. Removing the material the larvae are developing in is the control method extension guidance recommends. Boiling water kills maggots on contact if you want a first move, but killing them and leaving the food source that drew the flies restarts the cycle within a day.
Is bleach safe to use on a plastic garbage can?
Yes, at household dilution. Mix roughly one-third cup per gallon of water, keep the surface wet for a minute, then rinse thoroughly. Undiluted bleach can discolor and weaken plastic over time, and bleach must never contact vinegar, ammonia, or other cleaners.
Why does my garbage can still smell after I clean it?
Residue at the base survived the cleaning. Most instructions on how to clean a garbage can stop at rinsing. Rinsing moves loose debris but leaves the film bonded to the plastic, and that film re-seeds each new bag. The other two common causes are putting the can away before it dried and a scratched interior holding residue below the surface.
How often should I deep-clean my outdoor garbage can?
Every four to six weeks in summer and every ten to twelve weeks in cool months. Adjust to your own conditions rather than the calendar. If the smell returns before the next scheduled clean, shorten the interval by two weeks.
How do I stop a garbage can from smelling up my garage?
An enclosed space has no airflow to disperse trash can odor, so a can that seems tolerable at the curb becomes intolerable indoors. Run the same system, then store the can nearest the door or move it outside through the warm months.
Does putting baking soda in the bottom of the can actually work?
Partly. It absorbs odor well and will deodorize a garbage can that is already clean, but it does almost nothing for one that is not. It also saturates, so it only keeps working if you replace it when it starts to clump.
Two Moves, and One Habit
The system is two moves. Reset the can once to remove the bacteria producing the smell, then defend it by keeping the inside dry between pickups.
Start this weekend. Run the deep clean once, and let it dry properly in the sun. Then commit to two minutes with the hose on collection day, while the can is empty. That single habit does more than every deodorizer on the shelf combined, and it is short enough that you will still be doing it in October.
One honest limit. Maintenance cannot fix a lid that no longer seats flush, a base that holds water after rain, or an interior scratched deeply enough that residue sits below where a brush can reach. Those are failures of the container, and you will keep re-treating the same smell until the container changes. If your inspection turned up any of the three, outdoor trash cans that seal properly will end the cycle for good.